Normandy Defensive Installations
- pd-allen
- 2 days ago
- 17 min read

Introduction
I had visited Normandy several times, so this time, I concentrated on major German Defensive installations along the Normandy coast that I had not previously seen. I also threw in the British Normandy memorial. They have a seasonal display called Standing with Giants and this was my first chance to visit while the display was present.
British Normandy Memorial
The Memorial
Surprisingly, until recently there was no British Memorial in Normandy. On the 75th Anniversary of D-Day 06 Jun 2021 the memorial was finally opened. The memorial is situated on Mont Fleury about 700m behind Gold Beach at an elevation of 50m. The memorial commemorates all Commonwealth Nations that served under British Command. So, the Canadians listed here served with the Royal Air Force, Royal Navy or British Army Units. Members serving under the Canadian Military are not listed on this site.

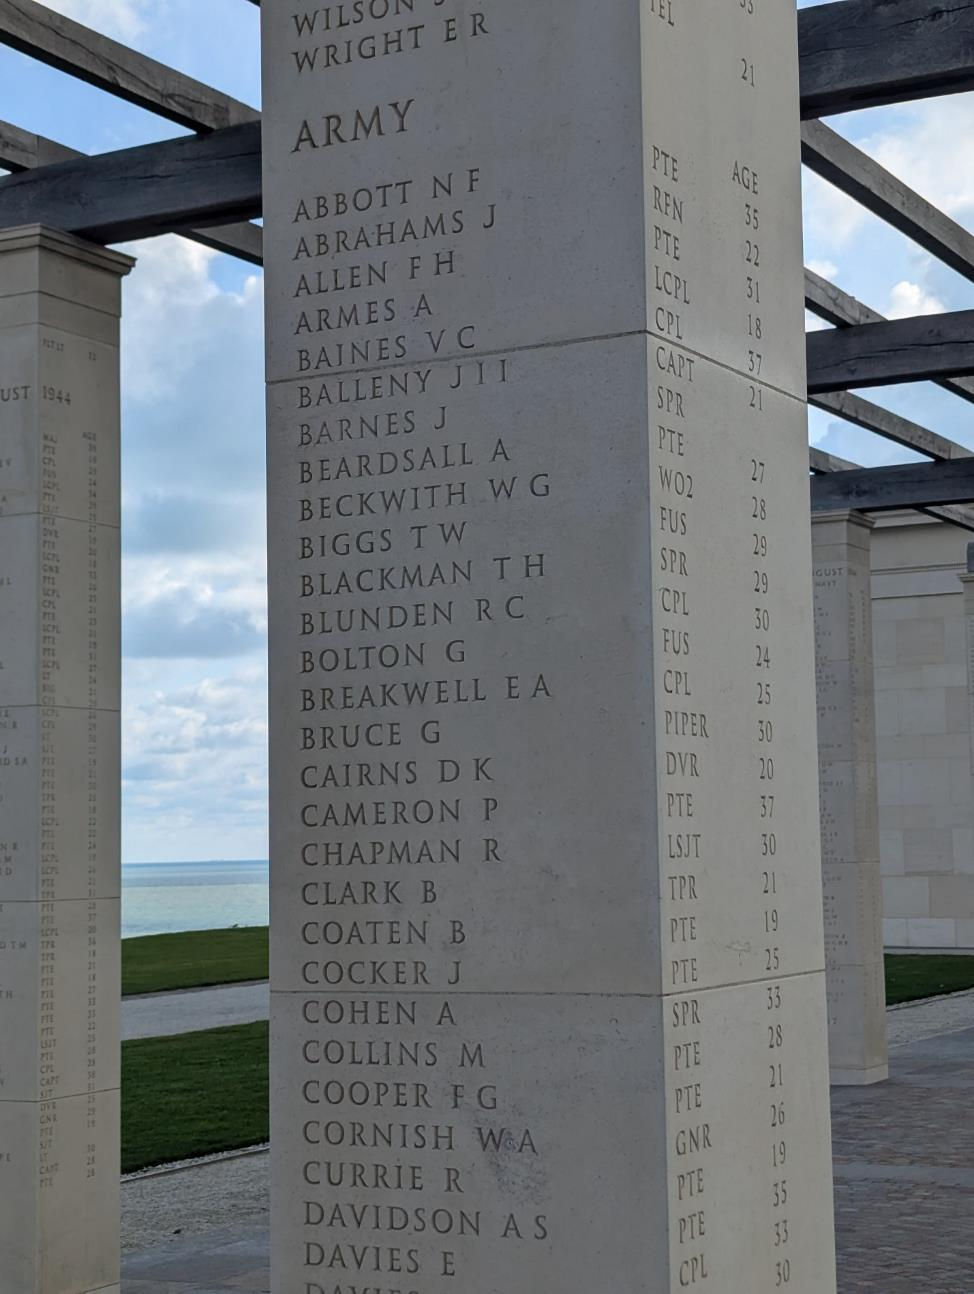
The memorial has a visitors’ centre, a walkway with information plaques on the Battle for Normandy and a memorial wall with the names of the 1,746 people killed on D-Day. The memorial columns commemorate the 22,442 soldiers serving under British Command that died during the Normandy Campaign from 06 June to 31 August 1944.
The information plaques are chronological and provide a detailed description of the Battle For Normandy. Du français au verso, bien sûr.

The site is well situated and provides a beautiful setting to commemorate the fallen.

The pathways within the memorial are designed to recreate the British Flag. The remnants of the Mulberry Harbour at Arromanches are visible in the top left of the following photo.

The D-Day Memorial wall lists the 1,746 soldiers under British Command who were killed on D-Day. A little fine tuning was ongoing during my visit.

The wall of names of the D-Day fallen.

There are 160 columns with the 22,442 names of the fallen listed in chronological order then sorted alphabetically for each service so you can trace the casualties through the phases of the battle.

The name is on one side of the column and their rank and age on the adjacent face so there are two sets of names on each column.
At the front of the memorial is a statue of three soldiers coming ashore on D-Day with Gold Beach as the backdrop.

The first wave.

The view from the front edge of the memorial gives you an idea of the elevation changes down to Gold Beach.

There is a memorial to the French Civilians who lost their lives during the liberation. The plaque reads:
This memorial is a solemn tribute to the memory of the thousands of French people who lost their lives on D-Day during the Battle of Normandy and during the liberation.

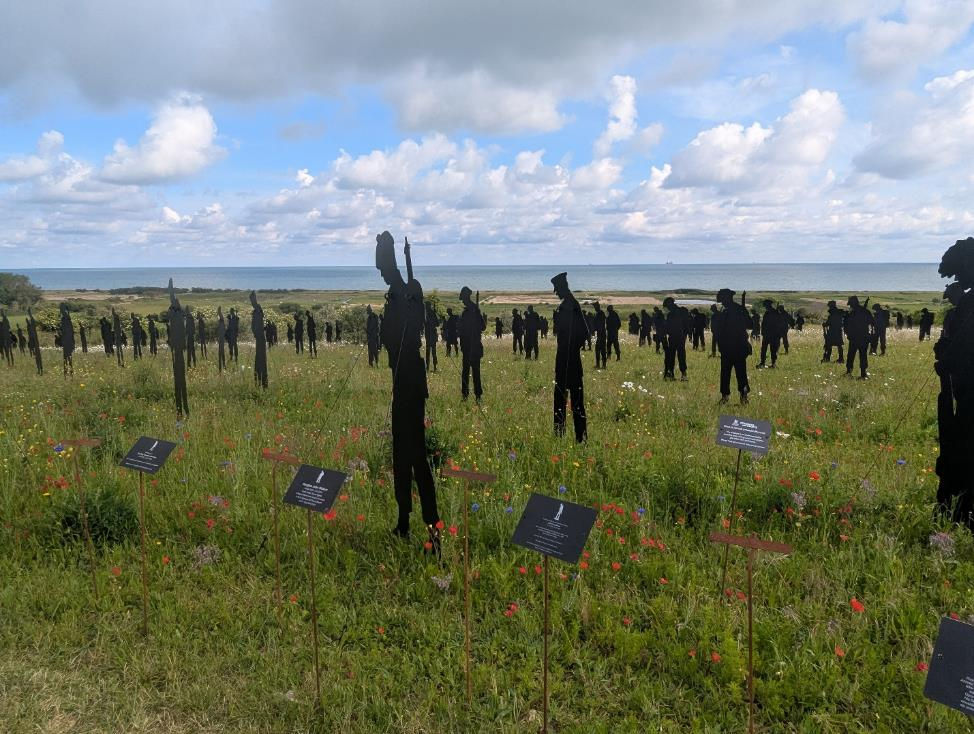
Standing With Giants
Dan Barton was the man who started the Standing With Giants project. He was inspired by a photograph of a dead soldier. Local people covered the soldier with a blanket and laid flowers on his body in recognition of the sacrifice of a soldier from far away who came to liberate them. Dan began cutting out silhouettes in a shed and soon the project took flight and quickly 3,500 people were involved in the tribute that became known as For Your Tomorrow, The People’s Tribute.

In the display there are 1,476 figures, representing the Army, Royal Airforce, Royal Navy and Merchant Marines killed on D-Day. In addition, there are two statues of Nurses and 50 Statues of French Freedom Fighters. The scale of the display is very moving. The silhouettes are located in a nature preserve, so the troops are standing among the wildflowers with poppies strewn throughout the field.
The plaques commemorate individuals, with the person’s name, unit, date of death and a memorial statement. Not all of them named fell in Normandy, many of the plaques list those who survived the war.
I can always tell what struck me by the number of photos I took of the subject. I’ve changed the photos in the blog several times as I progressed through my photo list. This display is deeply moving and I’m glad I waited until it was present before I visited the memorial.

There are sign posts pointing to the landing beaches.

Standing With Giants from the coastal point of view.

Two Nurses
Sister Mollie Evershed (27) and Sister Dorothy Field (32) served with the Queen Alexandra’s Imperial Military Nursing Service. On 6 June 1944, D‑Day morning, they were aboard the British hospital ship HMHS Amsterdam, which was evacuating wounded soldiers from the Normandy beaches.
The ship struck a mine off the Normandy coast shortly after 06:00. Despite the explosion and rapid flooding, both nurses refused to abandon their patients. They stayed below deck, continuing to help the wounded evacuate. They were last seen assisting injured men toward the lifeboats. They died when the ship sank, but 75 men survived, many because of their actions.

Traveling Display
The Standing with Giants display is on site from 26 April until 19 September this year. The display is set up in various locations in the UK for the fall season, then put in winter storage. There are a representative sample of the figures that people can get close to.

The storage cases form part of the display.

An aerial view shows the cases arranged in a semi-circle.

A view of the Memorial from Gold Beach taken during my 2024 visit to Normandy.

A zoomed in view of the memorial.

The British Normandy Memorial is a magnificent tribute to the fallen and should be part of any Normandy Visit.
Douvres Radar Station
Location
The radar museum 1944 located at Douvres called Distelfink (Gold Finch), about 5 km inland from Juno Beach is a really well preserved and extremely interesting museum. The radar site was located here because the 50 m elevation allowed 360-degree coverage of the area. The original site was more than 20 acres in size and featured over 30 bunkers and strongpoints.

The site had a circular layout providing 360-degree fields of fire, encircled by a 20-foot-high ring of barbed wire and minefields up to 13 meters wide. These obstacles, combined with extensive trench networks, created layered perimeters to deter infantry advances and channel attackers into kill zones. Approaches to the station were further secured by interconnected trenches, natural hedgerows, and reinforced houses at nearby Widerstandsnester (WN) 22 and WN 23a, which mounted 12 machine guns and mortar positions to cover inbound routes from the north and east. These outer defenses integrated with the main site's minefields and wire, forming a cohesive barrier that extended surveillance and firepower beyond the core bunker.

One of the camouflaged bunkers put to good use.

Radars
This site was the largest Radar facility in Normandy, was completed in 1943 and used extensively to control Luftwaffe night fighters as they attacked the Bomber streams heading to Germany.
The site had an Early Warning Wasserman Radar, Two medium Range Freya Radars and two Fire control WurtzBurg Radars.

The Wasserman Radar was mounted on a 50 m tower, had a long-range detection of up to 300km and operated in the 125-230 Mega Hertz (MHz) band.

The Freya Radars also provided early warning, up to 200 km, operating in the 120-129 MHz range and enabled coarse surveillance of approaching aircraft.

The Freya Radars passed on contact information to the Wurzburg Radar, which provided precision tracking in azimuth and elevation, using a 7.5 m parabolic Radar dish to provide accuracy of +/- 0.2 degrees in azimuth and +/- 0.1 degrees in elevation at a range of up to 70 km. The radar frequency was 560 MHz. This accuracy was sufficient to guide the night fighters into range of the bomber stream, or direct high precision anti-aircraft fire.
The Wurzburg Radar on the museum site was captured from a radar station in the Netherlands in March 1945.

The 20-ton dish could cover from 0-90 degrees in elevation and 360 degrees in Azimuth. An operator station was mounted on the rear of the dish. The massive drive gear controlled the motion in azimuth.

Radar Processing
I really enjoyed the Radar Museum. There was a great deal of information, obviously prepared by very knowledgeable and enthusiastic personnel. The audio guide was the best that I have heard in my many museum travels. The descriptions were detailed but short enough to keep your attention. I may be biased, I spent a long time working on Electronic Warfare to defeat Radars and was deeply interested in everything, but they did a good job presenting the basics and also telling the rest of the story.
A typical example was the poster explaining the Radar Processing Chain. I liked it because it was straight forward but encapsulated exactly how Air Defence Radar systems still operate today. There is a lot more automation now, but the processing blocks are still the same.

Some awesome low frequency radar plumbing!

Radar Plotting
The Radar control bunker was a multi level structure that was the largest one in Normandy.

The museum folks had built an awesome model showing the bunker construction. I am a big fan of models, so they won me over easily.
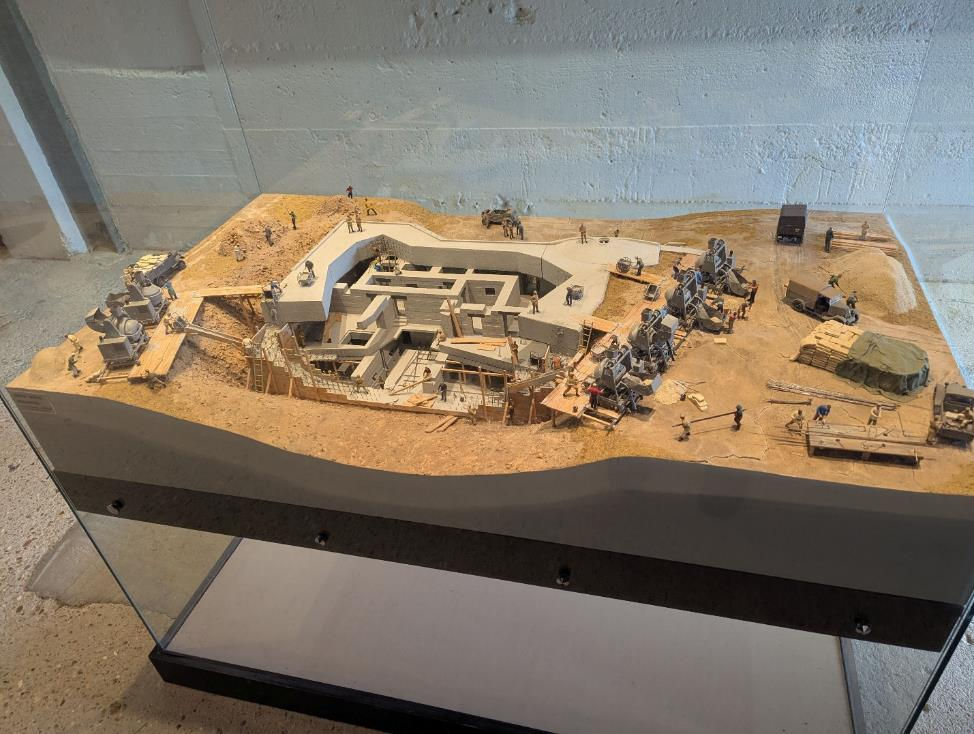
And of course, if you have model bunkers, you need to have model Radars as well. So even if you don’t care about the wavelength of the Radar, you can see their relative sizes based on the people and vehicles.

The Radar Control Room was also very interesting. The folks in the basement received integrated Radar information from the radar sites and projected a Red beam for an enemy aircraft or a Blue beam for a friendly. The crew on the upper table plotted time and altitude and passed on the information to the vertical map that was used by the controllers vectoring the fighters onto the Bomber stream.

Projection onto the plotting table.

Aircraft speed and altitude plot. Most of the Radar analysts and plotters were women.

Transparent wall map. The plotter had to draw backwards on a reverse plot so the controllers in the other room could see the correct view.

When we were in Malta, we visited the Lacaris War Rooms, the British equivalent of the German Aircraft plotting. In the British System, the Radar Filter room coordinated the raw Radar data into plots, and the Plotters showed the numbers, altitude and courses of the Radar Contacts. The Aircraft controllers sat in the Gallery and passed information on to the fighters. Different ways of displaying the same information.

Capturing the Radar Site
In the lead up to D-Day, the Allies systematically attacked and destroyed Radar sites all along the French coast, not concentrating on Normandy for fear it would reveal the invasion location. The Radar site at Douvres was left intact as the Allies flew intricate patterns dropping chaff at specific intervals to mimic an invading force.

The diversion worked, there were multiple reports of invading forces from Le Havre to West of Cherbourg, so the Germans had no idea of the actual location of the landing forces. The Radar sites were heavily Jammed with Electronic Countermeasures and liberal use of chaff overnight on the 5/6 June, and the radar antennas were taken out with Naval bombardments the morning of 06 June.
A destroyed Wurzburg radar dome.

Two soldiers buried beside the fallen Wasserman 50m antenna mast.

On the morning of D-Day, the 48th Royal Marine Commandos were tasked with seizing documents and equipment from the Radar station, but once they realized the formidable defences, they withdrew. The next morning, elements of the North Shore New Brunswick Regiment attempted to take the station with support from the 19th Field Regiment Artillery, but withdrew after taking casualties and making little progress.
The decision was taken to bypass and isolate the radar station, the radar antennas were destroyed, but due to the location of the site, the garrison could continue to monitor the Canadians’ movements.
Finally, on the afternoon of 17 June, the 41st Royal Marine Commandos along with 44 flail and Armoured Vehicle Royal Engineer (AVRE) tanks and heavy howitzers shelled the Radar Site. The German defenders were shocked and dazed and only put up minimal resistance. By 6:30 the Radar site was captured. 236 Germans were taken prisoner and the Radar site permanently off line.
Some commandos claiming ownership of the radar control bunker.

I really enjoyed the tour of the Radar station. The information was very well presented, and they provided information on different levels so everyone could learn about the operation.
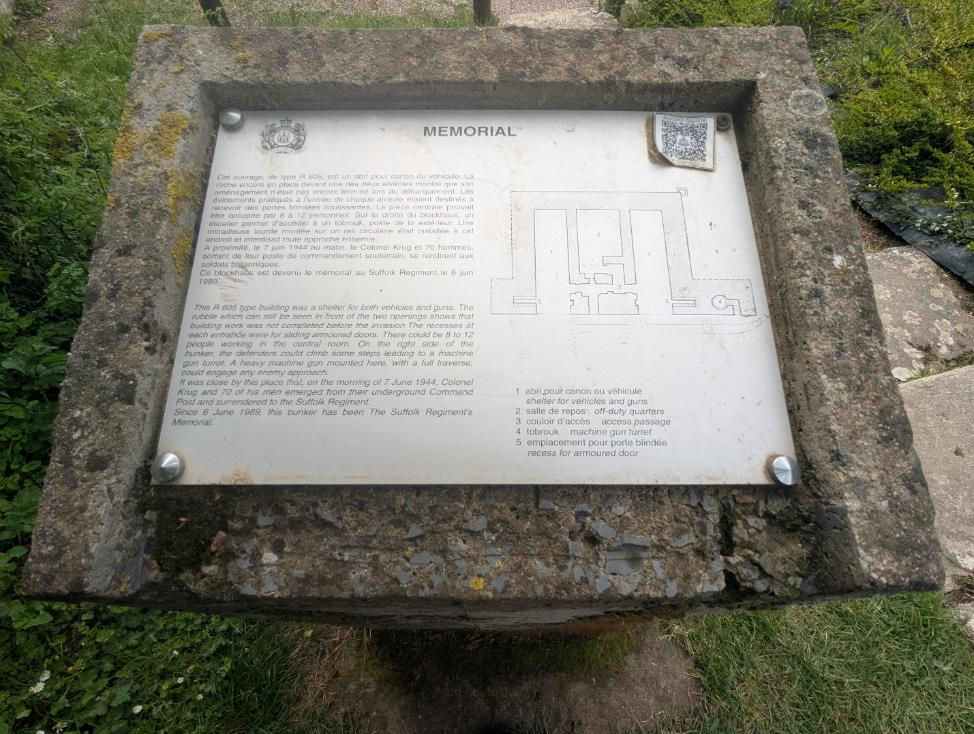
Hillman Strong Point
The Site

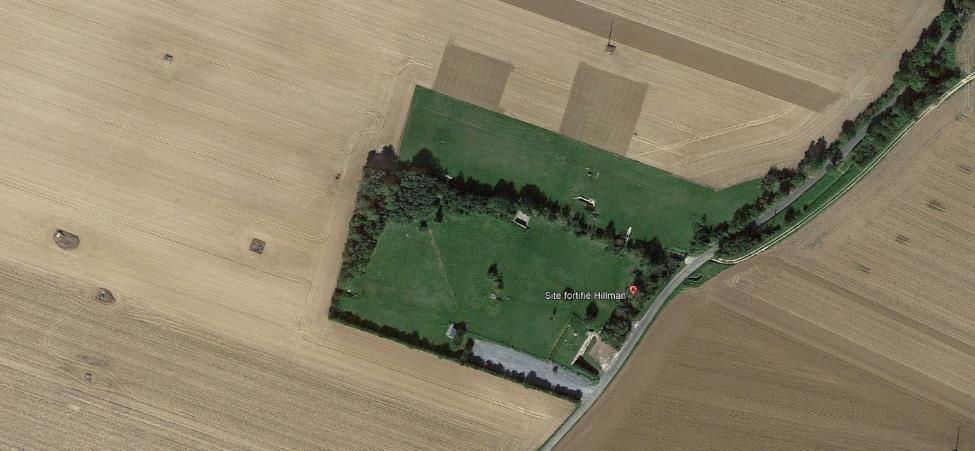
About 1 km inland from Sword Beach is the Hillman Strong Point (WN 17). Hillman was the headquarters for the German 736 Grenadier Regiment located on Hill 61, indicating it was 61 m above sea level. The location was spread over 60 acres, with a collection of 18 bunkers, 11 machine gun nests, multiple tobruks, metal cupolas, and anti-aircraft positions with an interconnected trench system. There were two rings of barbed wire surrounding the location with minefields in between, an extremely well-defended position manned by 150 men.

The site offered direct views of the landing beaches and had a cleared field of fire of 600m.

The Attack
The site was attacked by the 1st Battalion, Suffolk Regiment, the Goodfellow Brothers’ Regiment from WWI. The Suffolks landed on Sword Beach at 0830 and immediately moved inland to take Strong Points Morris and Hillman (code names based on British car manufacturers at the time). The artillery battery at Morris was taken first without a shot being fired, so the Suffolks proceeded to Hillman.
Around 1300, openings were blown in the barbed wire, and a narrow path cleared through the minefields for an infantry assault. There was at least 300m of open ground, so the troops crawled through the corn field that was about 18 inches high at the time, using smoke to try to mask their movements.
Two platoons made it through the wire but were immediately pinned down by intense machine gun fire. The infantry withdrew and it was late afternoon before a wider path could be carved through the wire so tanks could assist in the assault.

The metal cupolas proved very difficult to take out. The tank rounds just bounced off the metal and the machine gun continued firing. A member of the 13th/18th Royal Hussars tank regiment said later:
We were not able to penetrate the cupolas, but we were able to give the occupants a splitting headache.
Just to the right of the water tower, the Ferry to the UK is visible.

A zoomed in view of the Ferry gives you a better appreciation of the height differential.

Machine gun Tobruk integrated into an underground command bunker.

The second attack was more successful and by 2000 hours, the site was taken, but a large number of Germans remained holed up in the underground bunkers that proved difficult to penetrate.

The Germans held out until the next morning, when Colonel Krug led the remaining 70 soldiers to surrender.
Current Day Site
After the war, the site was reverted to farmland and the bunkers gradually filled with earth and rubble, preserving them in good condition. In 1989, Madame Lenaud, donated the land to the Suffolk Regiment to commemorate what happened during the war. Since then, Friends of the Suffolk Regiment and local volunteers have preserved and continue to restore the fortress. Hillman is one of the best restored strong points and an important historical reference to the German Atlantic Wall.
An aerial view shows the Hillman open air museum as well as the numerous bunkers that are located in a field. The grassed area is the restored site, but several other bunkers are visible to show the size of the original installation.
Guarding the car park is a Churchill Mark IV tank, a bit incongruous since the tank regiments active in the capture of Hillman all used Shermans. This Churchill tank was donated by the French Tank Museum in Saumur for the 80th Anniversary of D-Day in June 2024 as they had spare units. Various versions of the Churchill tank fought at Sword Beach and for most people, a tank is a tank, so the Churchill is better than an empty slab of concrete.

The bunker at the entrance contains a plaque to the Suffolk Regiment.

The plaque commemorates the fallen and the generosity of the French landowner in providing the site.

Each bunker has an information stele describing the layout and purpose of the bunker.
A German sentry watching the action on Sword Beach.

The 736 Regiment command bunker where Colonel Krug was holed up over night.

Command post information stele.

Bunker entrance.

Command post B.

A small section of trench that used to criss-cross the site.

Summary
Strong Point Hillman was another very interesting location to visit. You really get an appreciation for the importance of the high ground, which does not need to be very high in a flat area and the amount of effort and concrete the Germans put into their defences. The underground bunkers survived multiple bombing attempts and were never breached even after the site was captured by the Brits.
After taking Hillman, the Suffolks were supposed to move on and take Caen as well. The length of time it to capture Hillman is often given as the reason why Caen was not taken on D-Day. In fact, a took a month of bloody fighting before Caen was captured after being almost completely destroyed by airborne and artillery attacks. I don’t believe Caen was ever achievable on D-Day and the much more intensive that anticipated fortifications at Hillman just confirmed Caen was a city too far.
The Suffolks were also faulted for not being aggressive enough as they only suffered 10 killed and 24 wounded in the fight, but a direct assault would have resulted in catastrophic WWI level casualty levels.
Merville Battery
The Site
The last site I visited was Merville Battery, a collection of 4 large guns that had the range to fire on the port at Ouistreham and Sword and Juno Beach. It was essential that the Battery be taken out before the attack to prevent shelling of the beaches and the Naval fleet during the landings.

The 4 casemates were supplemented by 100 mm guns on circular emplacements, machine gun positions surrounded by two rings of barbed wire with a minefield in between. The current day site is an excellent museum with a C-47 aircraft on display, a well-signed walking path and multiple airborne memorials.

The Attack
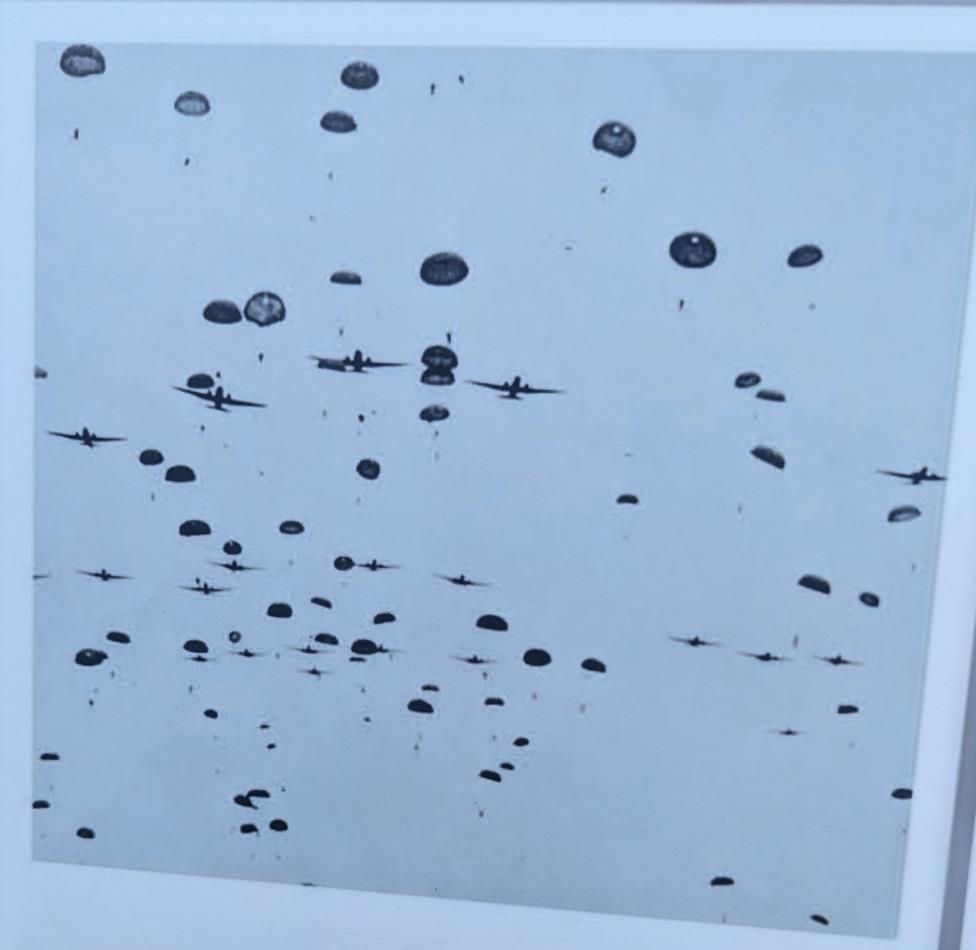
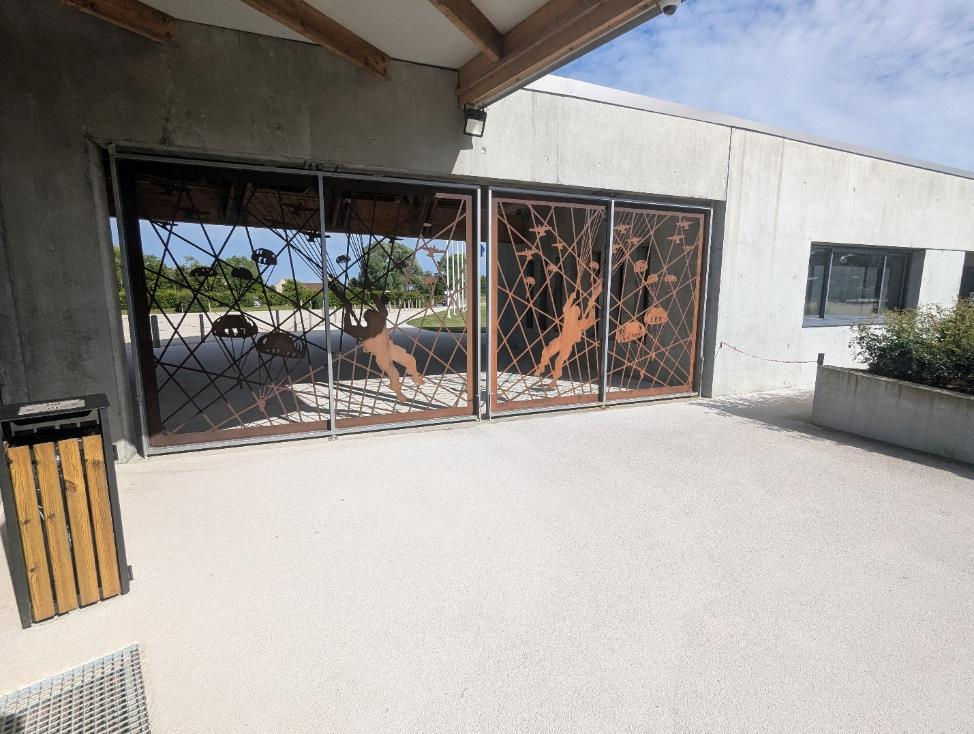
The plan was for the British 6th Parachute Division to land by parachute and gliders just after midnight on 06 June to take Pegasus Bridge, destroy other bridges in the area and take the Merville Battery. The 9th Parachute Battalion, commanded by Lieutenant Colonel Ottway, was assigned the Battery. They were scheduled to land in drop zone V, along with the first Canadian Airborne Battalion.

In addition to the parachute landings, in advance of the drop, four Horsa Gliders took off from Harwell in Berkshire to deliver 9 Para’s heavy weapons, explosives, equipment, jeeps and two anti-tank guns. Two gliders came down in the Channel, and in all six of the eight Horsa pilots died. None of 9 Para’s heavy weapons and equipment reached the appointed drop zone. A Horsa glider in flight.

A further 3 gliders, carrying 58 paratroopers, were scheduled to land within the Battery to coordinate with the ground assault. The site had been heavily bombed leading up to D-Day and the RAF delivered the final bombing attack at 0030. The bombing attack completely missed the Battery but made for some anxious moments for the pathfinders already on the ground. The Battery had been heavily cratered by repeated bombings, but the 6-foot-thick ceilings of the casemates had not been damaged.

The airborne landings went in just after midnight, but the pathfinder beacons failed, the aircrew didn’t see the lights because of smoke and dust from the bombardment, heavy flak dispersed the C-47 aircraft and strong winds blew the paratroopers off course. The battalion was scattered over a 50 square mile area so was in trouble before they even landed.
At 0130 when LCol Ottway reached the rendezvous point, he only had 100 of the expected 600 men. By 0230 when they moved off there was only 150 men with two machine guns, no radios, no charges to disable the guns and no engineers to clear the mine fields. They reached the Battery at 0400 when the gliders were scheduled. One glider had broken its tow rope and landed in Britian. The other two gliders could not locate the battery, and both were damaged by flak. One crashed 700 yards from the Battery and the second two miles away. Once the gliders had overshot, the 150 men pressed the attack with minimal weapons.

After a frenzied attack, and brutal hand to hand combat, the German troops (mostly Russian conscripts) surrendered. The paratroopers fired a signal flare to signify the capture of the guns and sent a carrier pigeon with the good news. They put what explosive they had in the guns, but it was not sufficient to destroy them. The backup plan was for the Cruiser Arethusa to shell the site at 0530 if there was no confirmation of capture, so the paratroops were forced to withdraw before finishing clearing the Battery. There were 24 killed and 50 wounded, and the Cruiser never fired on the Battery for fear that the Paratroops were still present.
The Germans were able to retake the battery and withstand another assault from 3rd British Commandos. Two guns were able to fire at a much-reduced rate with reduced accuracy but were silent during the crucial landing phases. The British never succeeded in capturing the Merville Battery and it remained active until the Germans withdrew on 17 August.
Merville Battery Museum
Origins
After the war, the Merville Battery was abandoned, its bunkers partially buried, its trenches filled in, the surrounding land reclaimed by vegetation and cows wandered the site. By the early 1980s,the casemates were flooded or filled with rubble, the command post was structurally unstable, and the site had no signage or pathways. Veterans who returned for D‑Day anniversaries were shocked at the deterioration.
A Veteran’s association was formed in 1982, and volunteers cleaned and stabilized the site. The museum was opened on 05 June 1983 with Veterans acting as guides. The museum continued to improve over the years and now is one of the most important D-Day memorials.
C-47 (Dakota) Aircraft
The C-47 (called Dakota by the Brits) was an important addition to the museum as it was the aircraft that delivered the vast majority of the Paratroopers. Over 10,000 C-47s were built during the war and served worldwide long after the war. The aircraft on site was repatriated in 2007 from an airfield in Bosnia. This aircraft had taken part in all airborne operations in Europe (Overlord – D-Day, Dragoon – Southern France, Market Garden - Arnhem, Repulse-Belgium and Varsity-Germany) as part of 9th US Army Air Force (USAAF).

To highlight the longevity of the Dakota, when I was in Cold Lake in the late 1970’s a Dakota, nicknamed Pinocchio, was fitted with a CF-104 Radar Nose to train the pilots how to operate the radar, and to make shopping runs into Edmonton to prevent cabin fever.

The aircraft was restored by volunteers and repainted in its D-Day markings with its original serial number 43-15073. Photos of the aircraft and pilot in 1944.

C-47s in action.
The nose art was chosen by the aircrew. SNAFU of course stands for Situation Normal, All F*ed Up. Wooden carving of the Airborne Symbol in the background.

The interior is set up in the jump configuration with bench seats and static jump lines attached to the roof.

Casemates (Gun Emplacements)
Casemate One now contains an immersive sound and lights show depicting the battle for the Battery.

An artillery piece in a ring stand.

A view of some other Casemates from the top of Casemate 2. A plaque on the top summarizes the battle very effectively. It describes all the problems the Paratroopers had, then states.
In spite of this, LCol Ottway and his men carried out their impossible task.
They didn’t know it was impossible, so they did it.

Historical presentations are located in each Casemate.

The business end of the Casemate where the guns went.

A schematic of the Casemates.

The Airborne Cap Badge.

The Command Bunker.

Memorials
The Memorial Cross. The plaque reads:
This museum is rare, for it is situated in a battlefield. The remains of British and German Soldiers still lie here from June 1944. Please keep that thought in mind and tread respectfully as you walk over this hallowed ground.
The Merville Battery is a Battle Honour of The Parachute Regiment.

Bust of LCol Ottway.

Airborne Memorial. The plaque reads:
In Memory of the British
Paratrooper Regiment Battalion and
The Support Forces of the Royal Navy,
Army and Royal Air Force. On June 6,
1944, At 5:00 AM, These Fighting
Forces Silenced the Battery Whose Firing
Would have Reached the Landing Beaches.

A very well-done museum that is well worth a visit.
Final Thoughts
Another grand visit to Normandy. There are so many sites and memorials that it is impossible to visit them all in a single visit. The weather was supposed to be quite bad during my visit, so I made sure I had some places I could duck out of the rain, but I got lucky and the worst rain I saw was walking back from dropping off the rental car in Maastricht.
It was great to get back from the beaches and explore. I really enjoyed seeing the large defensive sites, they gave you a very good understanding of the German defensive mindset. Find the highest ground around, build tightly integrated, multilevel defence systems and don’t spare the concrete. The Merville Battery Museum is by far the best attended, but The Radar Museum 1944 was my personal highlight, the detail of the presentations and audio guide suited me perfectly.
The British Normandy Memorial was most impressive, it should be on your must visit list, particularly if the Standing With Giants display is present (usually end April until mid September). It helps to put the casualty numbers into focus and gives you pause to think this was the British losses for a single day of an 85-day battle.
Over the entire Normandy Campaign, the Americans suffered 29,000 killed, the Brits 11,000 killed, the Canadians 5,000 and the Germans approximately 30,000 killed with 210,000 missing or captured.


Another excellent visit to Normandy. I found the Standing with Giants display particularly moving. I also think of the important roles women played in the war, whether it was the code breakers, the bomb makers back home, the nurses and the radar operators. They were all so valued until the war was over and the boys came back home. The ladies lost their jobs so the returning soldiers could take over. Well done again, Paul. Dale